The guide
Lineside, scenario by scenario: what you want to do, the keys that do it, and what you see. Each shortcut is given for macOS, then for Windows.
First steps
- Open a folder with ⌘O / Ctrl+Shift+O. A git repository joins the rail as a project; select it to see its dashboard, its lanes and its agents.
- Agents ▸ Install Claude Code Hooks… lets Lineside follow your agents. It adds hooks to
~/.claude/settings.json, keeps a backup, and is undone from the same menu. - Start
claudein a terminal of Lineside. Only the sessions started after the hooks were installed are followed.
You open ~/code/atlas-api: atlas-api appears on the rail, in its own colour. You start claude and ask for something; its node turns ⚡️ while it works, then 🟢 when its turn is over.
Follow your agents
The rail reads from top to bottom, in the order the keyboard walks it. Under each project come its lanes and its terminals, joined by a line of its colour.
A node says what its agent does: ⚡️ working and ⌛️ waiting on you — these two move —, 🛑 an API error stopped its turn, 🟢 its turn is over. In front of a context, ✳ marks an agent’s session, >_ a program or a plain terminal, and a bell a terminal that rang while you were looking elsewhere.
Your turn keeps those waiting on you, oldest first. ⌘⇧A / Ctrl+Shift+A leads to the oldest, then to the next. A permission request is answered from the rail.
Under its branch, each station gives its git state when there is something to say: how far behind first, then ahead, then how many files are touched. The detail shows on hover.
The context gauge and the quotas come from your Claude Code status line: a script that drops its payload in ~/.claude/statusline/<session>.json. Lineside does not provide that script.
Three agents run on three projects. One asks to run npm run build: its node turns ⌛️ and it joins Your turn. ⌘⇧A, you read the request, you answer — it goes back to ⚡️.
Hand a task to an agent
A task is a brief and a lane. Lineside creates the lane, opens its terminal and starts the agent on the brief; the lane takes the selection and the keyboard.
- ⌘T / Ctrl+Shift+T opens the brief. ⇧↩ / Shift+Enter adds a line, and a pasted screenshot joins it.
- Send it: the lane is created on a new branch, filed under its project, and its agent starts.
- ⌘⌥↓ / Ctrl+Alt+↓ and ⌘⌥↑ / Ctrl+Alt+↑ jump from project to project; ⌘⌥→ / Ctrl+Alt+→ and ⌘⌥← / Ctrl+Alt+← turn within a project, between it, its lanes and its terminals.
⌘L / Ctrl+Shift+L opens a lane without an agent, on a new branch or an existing one. ⌘N / Ctrl+Shift+N opens a plain terminal in the folder you are looking at, and ⌘⌥T / Ctrl+Alt+T one that belongs to no project.
On atlas-api, you hand “add a rate limiter” to one agent and “fix the flaky login test” to another. Two lanes appear under the project, each with its branch and its agent, while you keep working in the main checkout.
Review and commit
- ⌘D / Ctrl+Shift+D opens the review beside the terminal: the uncommitted files, each with its diff.
- Space ticks the file that has the focus; ← and → move from one scope to the other.
- Write the message: ⌘↩ / Ctrl+Enter commits from anywhere in the panel.
- Push counts the commits that will leave, Pull those that will arrive. Pull only fast-forwards, and refuses a branch that has diverged.
⌘⇧H / Ctrl+Shift+H opens the Git window on the context: the history as a graph, where the project’s lanes appear as lines, then the branches, each with its gestures — open its lane, switch to it, new lane, merge here, delete.
Switching, merging and pulling are refused while an agent works in the folder. Rebasing and conflicts happen in the terminal.
The agent on issue/41-rate-limiter has finished its turn. ⌘D: ratelimit.go and its test show as uncommitted. You read the diff, tick both, type “Add a token-bucket rate limiter”, ⌘↩, then Push, which says one commit will leave.
From an issue to a merge
A project’s forge is read by glab or gh, whichever is logged in to its host. The Forge icon of the banner says, on hover, where the remote lives.
- ⌘Y / Ctrl+Shift+Y opens the issue editor: a title, a Markdown body with live preview, the project’s labels, a due date on GitLab. ⌘↩ / Ctrl+Enter creates it; the draft is saved as you type.
- ⌘G / Ctrl+Shift+G opens the Forge window: the open issues and merge requests, each issue with its state — lane, working,
!12. - ⌘↩ / Ctrl+Enter on an issue reads it again and hands it to an agent, on a lane
issue/12-…that starts from the main checkout. One issue, one lane. - Merge request, on the issue, leaves from the lane’s branch towards the default branch, with
Closes #12. It is confirmed first, and the confirmation names what leaves.
Issue #41 asks for a rate limiter. ⌘G, pick #41, ⌘↩: the lane issue/41-rate-limiter opens with its agent. When its turn is over, ⌘D to read and commit, then Merge request.
The editor
⌘E / Ctrl+Shift+E opens the editor beside the terminal; ⌘J / Ctrl+Shift+J gives it the whole stage, and ⌘S / Ctrl+Shift+S saves.
In a Markdown file, the live preview hides the marks outside the cursor’s lines, and checkboxes tick with a click; ⌘U / Ctrl+Shift+U switches to the raw source. Vim mode is turned on from the palette, the Vim button or "vim": true in the settings.
⌘I / Ctrl+Shift+I sends the selection — or the cursor’s line — to the agent’s prompt as @path#L12-18, without Enter. The tab must be saved: the agent reads the disk.
The editor never writes over a file that an agent rewrote since it was opened: it reloads it if you changed nothing, and tells you otherwise.
⌘K, /rate, Enter: ratelimit.go opens in the editor. You select the allow function and press ⌘I: the agent’s prompt receives @ratelimit.go#L18-30. You add “cover the refill case with a test”, and send it yourself.
Find anything
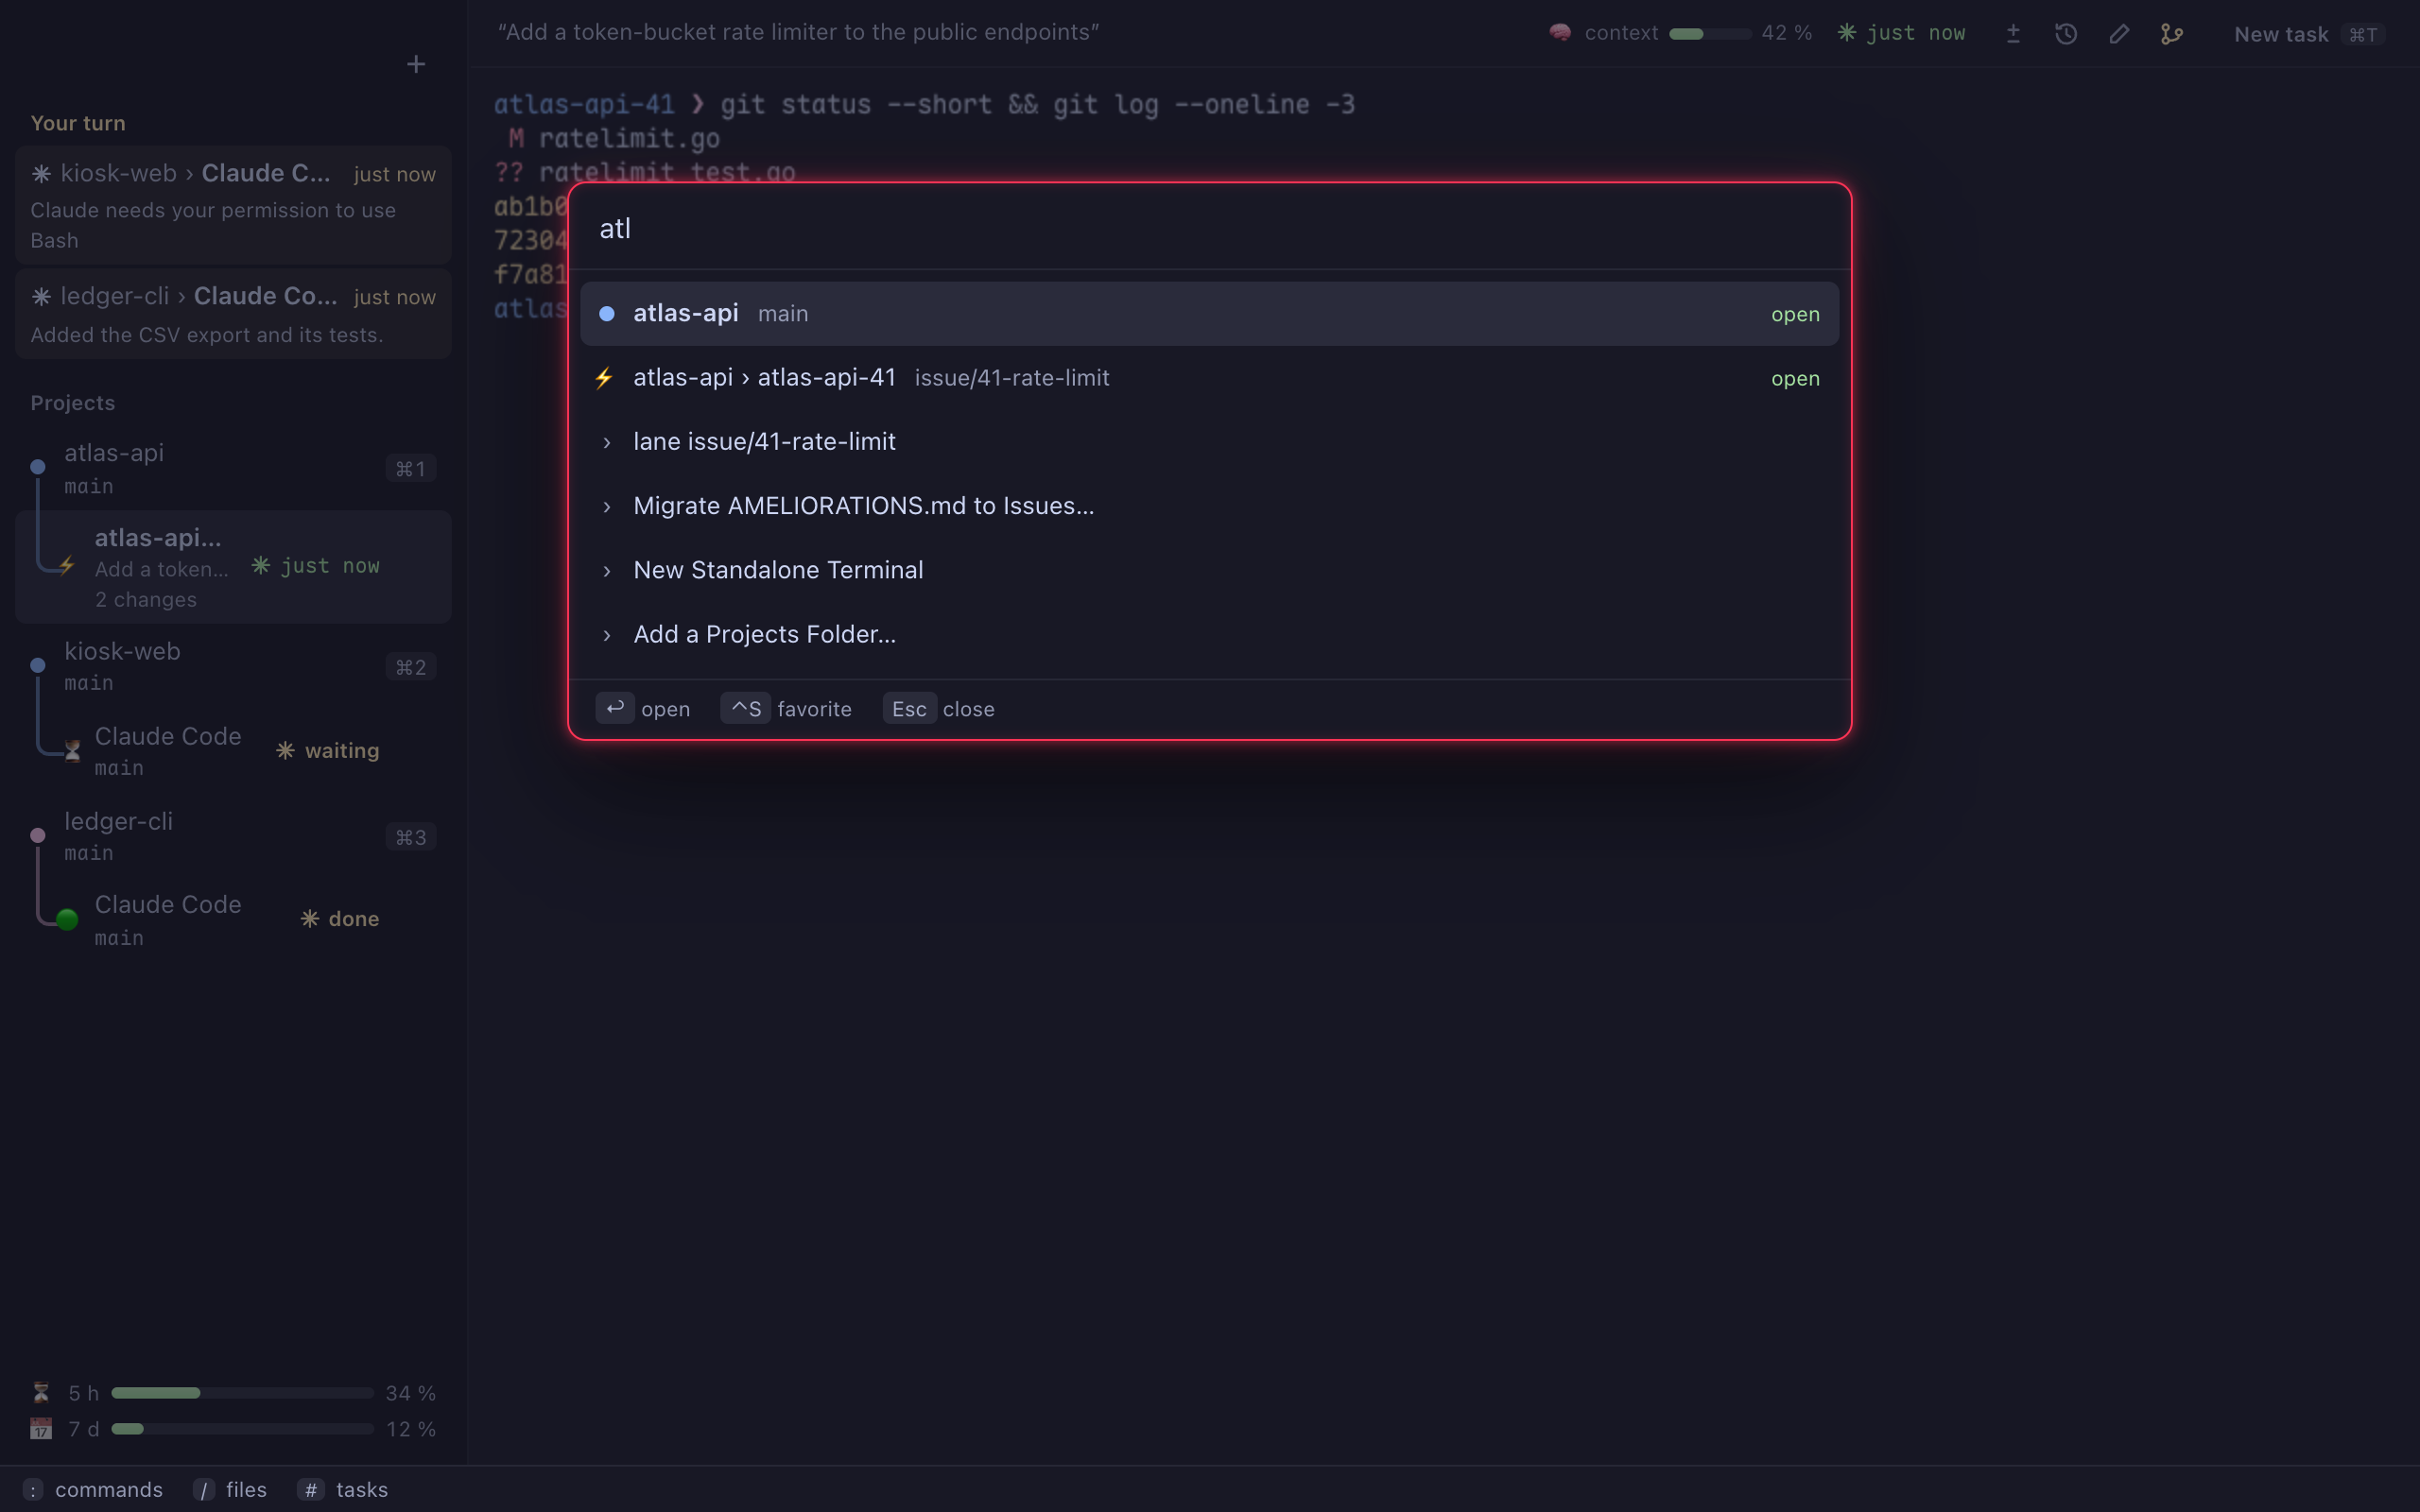
⌘K / Ctrl+Shift+K opens the palette. What it searches depends on its first character:
- nothing — projects and commands, then, as you type, the open lanes and terminals by name or branch;
:— commands only;/— the folders of the context: Enter goes into a folder, or opens a file in the editor;#— the open issues of the forge, or the entries ofAMELIORATIONS.md; Enter puts the one you pick in the agent’s prompt, without sending it.
On a French Mac keyboard, / and # need ⇧.
⌘K, atl: the atlas-api project and its lane come first, and Enter goes there. ⌘K, #: the open issues of the forge; Enter puts #41 in the agent’s prompt, ready for you to add a word and send it.
Jot down an idea
⌘⇧M / Ctrl+Shift+M — or, from any application, the key set by "noteShortcut", F16 by default — opens the quick note on the project you are looking at: a title, a type, and a Markdown body that takes pasted screenshots.
⌘↩ / Ctrl+Enter adds it as an entry A-N of the project’s idea box, AMELIORATIONS.md in the main checkout. Nothing is committed. When an idea matures, Convert A-N to an issue turns it into one.
In the middle of a review, an idea: “retry the forge when it times out”. ⌘⇧M, a title, a type, ⌘↩: it becomes entry A-23 of AMELIORATIONS.md, uncommitted, waiting to become an issue.
Keyboard reference
On macOS, ⌘ belongs to Lineside. On Windows, Ctrl stays with the shell, and Lineside’s gestures take Ctrl+Shift. Holding either shows the shortcuts of the moment.
| Gesture | macOS | Windows |
|---|---|---|
| Open a folder | ⌘O | Ctrl+Shift+O |
| Palette | ⌘K | Ctrl+Shift+K |
| New task | ⌘T | Ctrl+Shift+T |
| New lane | ⌘L | Ctrl+Shift+L |
| New terminal | ⌘N | Ctrl+Shift+N |
| New standalone terminal | ⌘⌥T | Ctrl+Alt+T |
| Next one waiting on you | ⌘⇧A | Ctrl+Shift+A |
| Review changes | ⌘D | Ctrl+Shift+D |
| Git history | ⌘⇧H | Ctrl+Shift+H |
| Forge | ⌘G | Ctrl+Shift+G |
| New issue | ⌘Y | Ctrl+Shift+Y |
| Quick note | ⌘⇧M | Ctrl+Shift+M |
| Editor | ⌘E | Ctrl+Shift+E |
| Editor, full stage | ⌘J | Ctrl+Shift+J |
| Save | ⌘S | Ctrl+Shift+S |
| Markdown preview or source | ⌘U | Ctrl+Shift+U |
| Send the selection to the agent | ⌘I | Ctrl+Shift+I |
| Hide the rail | ⌃⌘S | Ctrl+Alt+S |
| Next panel | ⌥Tab | F6 |
| Next or previous project | ⌘⌥↓ ⌘⌥↑ | Ctrl+Alt+↓ Ctrl+Alt+↑ |
| Within a project | ⌘⌥→ ⌘⌥← | Ctrl+Alt+→ Ctrl+Alt+← |
| Project 1 to 9 — the key read where it sits: ⌘& on AZERTY | ⌘1…⌘9 | Ctrl+Shift+1…Ctrl+Shift+9 |